
AgentTakt
Review & approve AI agent task plans in a ComfyUI-style node editor, right in your terminal (MCP server + TUI)
README
AgentTakt



Review, edit, and approve AI agent task plans in a ComfyUI-style visual node editor — right in your terminal.
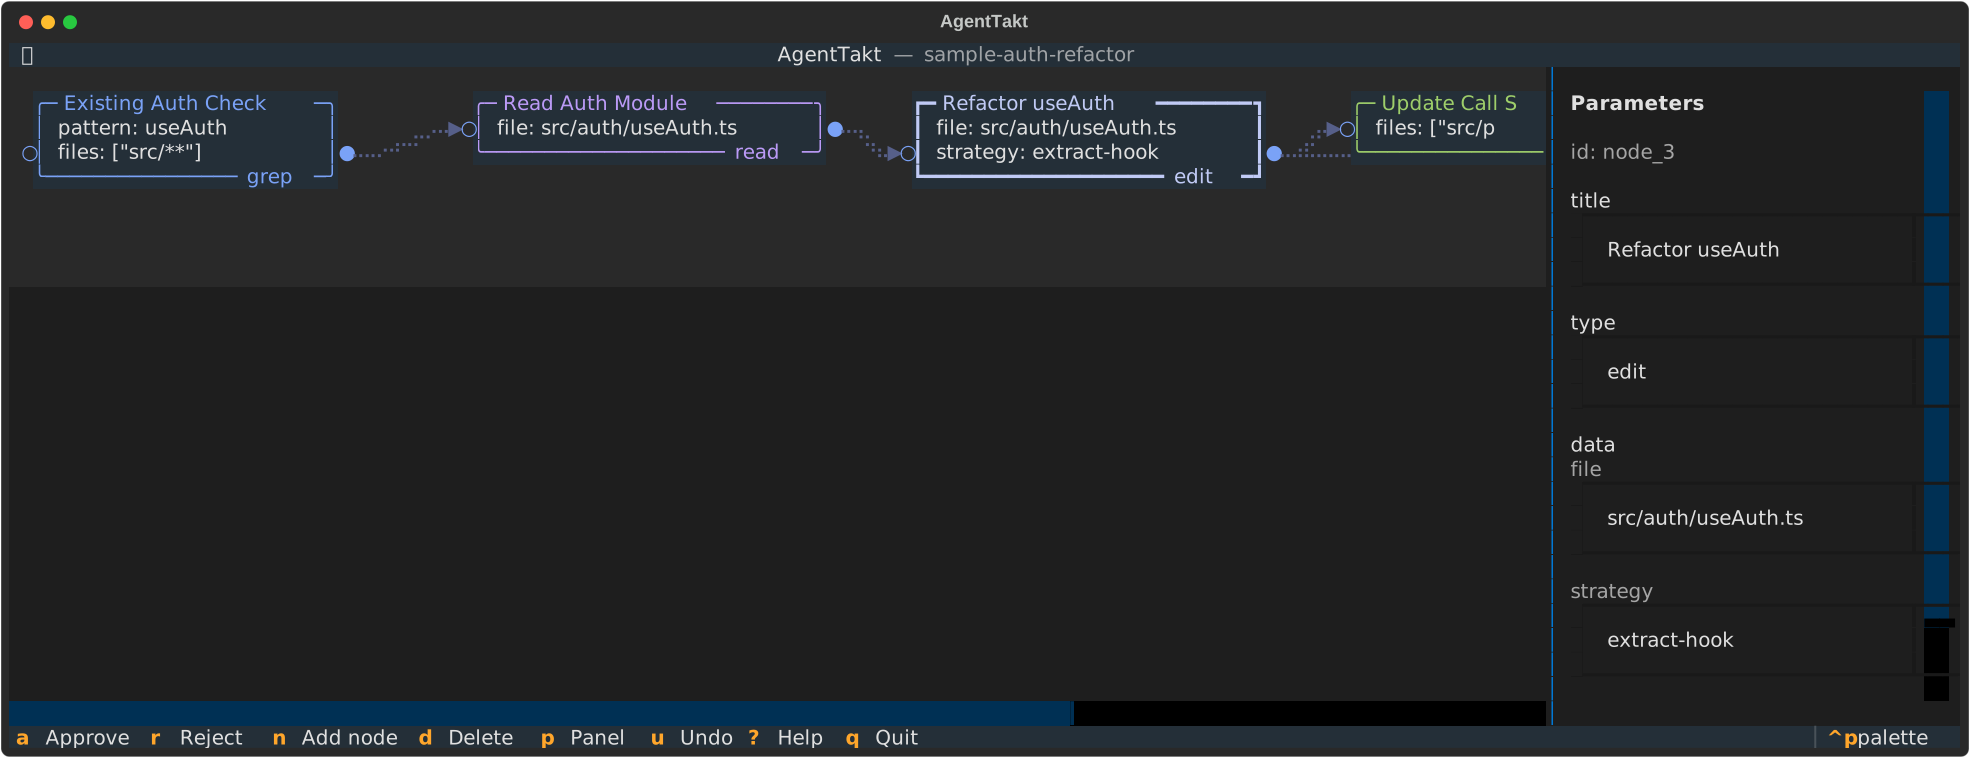
AgentTakt is an MCP (Model Context Protocol) server and TUI tool. When an AI agent (an "Executor" such as Claude Code) sends a task execution plan over MCP, AgentTakt renders it as a node graph in your terminal. You review it with mouse and keyboard — move, add, and delete nodes, draw dependency edges, edit parameters — then approve, and the edited plan JSON is returned to the Executor for execution.
Claude Code (Executor)
   │ stdio (MCP)                        your other terminal
   ▼                                           │
[agenttakt serve] ── Unix domain socket ──▶ [agenttakt (TUI)]
 MCP server                               review / edit / approve
Features
- Terminal-native — no web UI; everything runs inside your terminal
- Visual node editor — rounded nodes, dependency edges, and per-type coloring, powered by Textual
- Mouse-first editing — drag nodes to move them, draw edges between ports (rubber band), click to select and delete
- Safe approval loop — cycle detection (DAG guarantee) and other validations at the entry point, returning errors the agent can self-correct
Requirements
- Python 3.10+ (recommended: uv)
- A terminal emulator with mouse reporting (iTerm2, WezTerm, kitty, Ghostty, ...)
Installation
If you have uv, no installation is needed. uvx agenttakt fetches and runs AgentTakt on demand, and the .mcp.json example below starts the MCP server the same way.
If you don't have uv, install AgentTakt once:
brew install ryoohshima/tap/agenttakt    # Homebrew
pipx install agenttakt                   # pipx
Installing is also handy for everyday use even with uv — you start the TUI by hand, so plain agenttakt beats typing uvx agenttakt each time:
uv tool install agenttakt
Quick Start
AgentTakt runs as two processes: the MCP server, which Claude Code starts for you, and the TUI, which you start yourself in a separate terminal. The TUI is what displays the plan, so start it before asking the Executor for approval.
┌─ Terminal A: you ───────────────────┐   ┌─ Terminal B: Claude Code ───────────┐
│ $ uvx agenttakt                     │   │ $ claude                            │
│                                     │   │                                     │
│   ╭─ grep ───╮                      │   │ > Plan the refactor, then ask       │
│   │ pattern  │───╮                  │   │   me to approve it                  │
│   ╰──────────╯   │                  │   │                                     │
│             ╭────▼─────╮            │   │   calls request_approval(plan)      │
│             │   edit   │            │   │   waiting for approval...           │
│             ╰──────────╯            │   │   (blocked until you decide)        │
│                                     │   │                                     │
│   [a] Approve   [r] Reject          │   │                                     │
└─────────────────────────────────────┘   └─────────────────────────────────────┘
             ▲                                                    │
             ╰──────────────── Unix domain socket ────────────────╯
Running the TUI in the same session as Claude Code does not work. A stdio MCP server has its standard input and output reserved for protocol traffic, so the same process cannot also drive a full-screen terminal UI. That is why the two halves are separate processes talking over a Unix domain socket.
1. Start the TUI (in its own terminal)
uvx agenttakt # if installed: agenttakt (short alias: agt)
An idle screen appears, waiting for plans from the Executor. Leave this terminal open. If no TUI is running when the Executor calls request_approval, the call fails with:
AgentTakt editor is not running. Ask the user to run "agenttakt" in a separate terminal, then call request_approval again.
2. Register the MCP server with the Executor (Claude Code)
Add the following to your project's .mcp.json:
{
  "mcpServers": {
    "agenttakt": {
      "command": "uvx",
      "args": ["agenttakt", "serve"],
      "timeout": 1800000
    }
  }
}
[!IMPORTANT] Setting
timeout(milliseconds) explicitly is required. Therequest_approvaltool blocks until the human finishes reviewing. MCP progress notifications do not extend client-side timeouts, so the default would cut the request off before approval. The example above sets 30 minutes (1800000).
3. Request approval from the Executor
When the Executor calls the MCP tool request_approval(plan, summary), the plan appears in the TUI as a node graph. Once the human edits and approves (or rejects) it, the result is returned as:
{ "status": "approved", "plan": { "...edited plan..." }, "reason": null }
See docs/schema.md for the plan JSON format and what to write in each node.
Debug mode (try it without MCP)
uvx agenttakt open examples/sample_plan.json --out edited.json
Loads a plan from a file, opens the editor, and writes the approval result to --out.
Key Bindings
| Key | Action |
|---|---|
a |
Approve the plan (confirmation dialog) |
r |
Reject the plan (with a reason) |
n |
Add a node |
d / Delete |
Delete the selected node/edge |
u / U |
Undo / Redo |
| Arrow keys | Move the selected node by one cell (fine-tuning) |
Escape |
Clear selection |
p |
Toggle the parameter panel |
? |
Help (controls and how to write type / data) |
q |
Quit |
Mouse: drag a node to move it; drag from a node's output port (●, right edge) and release on another node to create an edge.
Edges are drawn as braille Bezier-like curves by default. If they render poorly in your environment, switch to rounded orthogonal lines with --edges orthogonal.
Documentation
- Plan JSON schema — data model, node fields, what to write in
type/data, and validation rules
License
推荐服务器

Baidu Map
百度地图核心API现已全面兼容MCP协议,是国内首家兼容MCP协议的地图服务商。

Playwright MCP Server
一个模型上下文协议服务器,它使大型语言模型能够通过结构化的可访问性快照与网页进行交互,而无需视觉模型或屏幕截图。

Magic Component Platform (MCP)
一个由人工智能驱动的工具,可以从自然语言描述生成现代化的用户界面组件,并与流行的集成开发环境(IDE)集成,从而简化用户界面开发流程。

Audiense Insights MCP Server
通过模型上下文协议启用与 Audiense Insights 账户的交互,从而促进营销洞察和受众数据的提取和分析,包括人口统计信息、行为和影响者互动。

VeyraX
一个单一的 MCP 工具,连接你所有喜爱的工具:Gmail、日历以及其他 40 多个工具。

graphlit-mcp-server
模型上下文协议 (MCP) 服务器实现了 MCP 客户端与 Graphlit 服务之间的集成。 除了网络爬取之外,还可以将任何内容(从 Slack 到 Gmail 再到播客订阅源)导入到 Graphlit 项目中,然后从 MCP 客户端检索相关内容。

Kagi MCP Server
一个 MCP 服务器,集成了 Kagi 搜索功能和 Claude AI,使 Claude 能够在回答需要最新信息的问题时执行实时网络搜索。

e2b-mcp-server
使用 MCP 通过 e2b 运行代码。

Neon MCP Server
用于与 Neon 管理 API 和数据库交互的 MCP 服务器

Exa MCP Server
模型上下文协议(MCP)服务器允许像 Claude 这样的 AI 助手使用 Exa AI 搜索 API 进行网络搜索。这种设置允许 AI 模型以安全和受控的方式获取实时的网络信息。