
Apify Store API MCP Server
Enables querying the Apify Store to retrieve structured data on public Actors including pricing, usage trends, ratings, and categories. Integrates with AI agents for market research and competitor tracking.
README
🛒 Apify Store API: commercial intelligence on every Apify Store Actor
Extract pricing, usage trends, reliability, ratings, and categories for every public Actor in the Apify Store, as clean structured JSON.
- Actor landing page: https://apify.com/johnvc/store-actor-intelligence-api?fpr=9n7kx3
- Get a free API key: https://apify.com?fpr=9n7kx3
This API reads the Apify Store and returns one row per Actor with the data that actually matters for analysis: the pricing model and per-event price ladder, total and 7/30/90-day active users, total runs and builds, a 30-day success rate, bookmark counts, and review ratings, plus the title, developer, categories, and description. Filter by keyword, category, pricing model, or developer, or sweep the entire Store in a single run. Built for market research, competitor tracking, pricing analysis, and AI agents.
🎬 Video Walkthrough
🚀 Quick Start (Python + uv)
Prerequisites: Python 3.11+ and a free Apify API key (https://apify.com?fpr=9n7kx3).
# 1. Install uv if you do not have it
curl -LsSf https://astral.sh/uv/install.sh | sh

# 2. Clone and enter the repo
git clone https://github.com/johnisanerd/Apify-Store-API.git
cd Apify-Store-API

# 3. Install dependencies
uv sync

# 4. Add your API key
cp .env.example .env        # then paste your APIFY_API_TOKEN

# 5. Run the example
uv run python store-api-example.py
✨ Why use this API
- The whole catalog, structured. One run returns every public Store Actor as JSON, no manual copying from listing pages.
- Real commercial signals. Pricing model, per-event prices, total and monthly users, run volume, and a computed 30-day success rate, all in one row.
- Filter or sweep. Narrow by keyword, category, pricing model, or developer, or set
maxItems: 0to pull the entire Store. - Track changes over time. Run it on a schedule to watch pricing moves, new entrants, and reliability trends across the marketplace.
- MCP-ready. Hand it to Claude, Cursor, or ChatGPT as a live tool (see the install sections below).
- Cheapest in its class. Pay-per-result pricing with no per-run fee, so even a full-catalog sweep costs very little. See the current price on the Store card.
🧪 Usage Examples
Basic (top Actors in one category):
{
  "category": "AI",
  "sortBy": "popularity",
  "maxItems": 25
}
Advanced (free social-media Actors, with full README and input schema for each):
{
  "search": "instagram",
  "category": "SOCIAL_MEDIA",
  "pricingModel": "FREE",
  "sortBy": "popularity",
  "maxItems": 10,
  "includeDetails": true
}
⚙️ Input Parameters
| Parameter | Type | Required | Default | Description |
|---|---|---|---|---|
search |
string | No | (none) | Keyword filter across title, name, description, developer, and README. |
category |
enum | No | (all) | One of 25 Store categories: AI, AGENTS, AUTOMATION, BUSINESS, DEVELOPER_TOOLS, ECOMMERCE, LEAD_GENERATION, MARKETING, NEWS, SEO_TOOLS, SOCIAL_MEDIA, TRAVEL, REAL_ESTATE, JOBS, EDUCATION, GAMES, VIDEOS, SPORTS, INTEGRATIONS, MCP_SERVERS, OPEN_SOURCE, FOR_CREATORS, COVID_19, DEVELOPER_EXAMPLES, OTHER. |
pricingModel |
enum | No | (all) | FREE, FLAT_PRICE_PER_MONTH, PRICE_PER_DATASET_ITEM, or PAY_PER_EVENT. |
username |
string | No | (all) | Filter to one developer handle (e.g. apify). |
sortBy |
enum | No | relevance |
relevance, popularity, newest, or lastUpdate. |
maxItems |
integer | No | 1000 |
Maximum Actors to return. Set to 0 for the entire Store (~33,000+). |
offset |
integer | No | 0 |
Skip this many Actors first (resume or shard a large run). |
includeDetails |
boolean | No | false |
Also pull each Actor's full README and input schema (1-2 extra calls per Actor). |
📦 Output Format
Each dataset item is one Store Actor. Representative row:
{
  "result_type": "actor",
  "actorId": "aYG0l9s7dbB7j3gbS",
  "name": "website-content-crawler",
  "username": "apify",
  "title": "Website Content Crawler",
  "url": "https://apify.com/apify/website-content-crawler",
  "categories": ["AI", "DEVELOPER_TOOLS", "BUSINESS"],
  "totalUsers": 21786,
  "monthlyUsers": 3355,
  "totalUsers7Days": 1307,
  "totalUsers90Days": 7260,
  "totalRuns": 4894213,
  "totalBuilds": 202,
  "runs30DaysTotal": 511458,
  "runs30DaysSucceeded": 496871,
  "successRate30Days": 97.15,
  "bookmarkCount": 491,
  "reviewRating": 4.8,
  "pricingModel": "FREE",
  "apifyMarginPercentage": 0.2,
  "scrapedAt": "2026-06-29T18:00:00+00:00"
}
With includeDetails: true, each row also carries readme, inputSchema, seoTitle, seoDescription, isDeprecated, and latestVersion.
Install in Claude Cowork Desktop
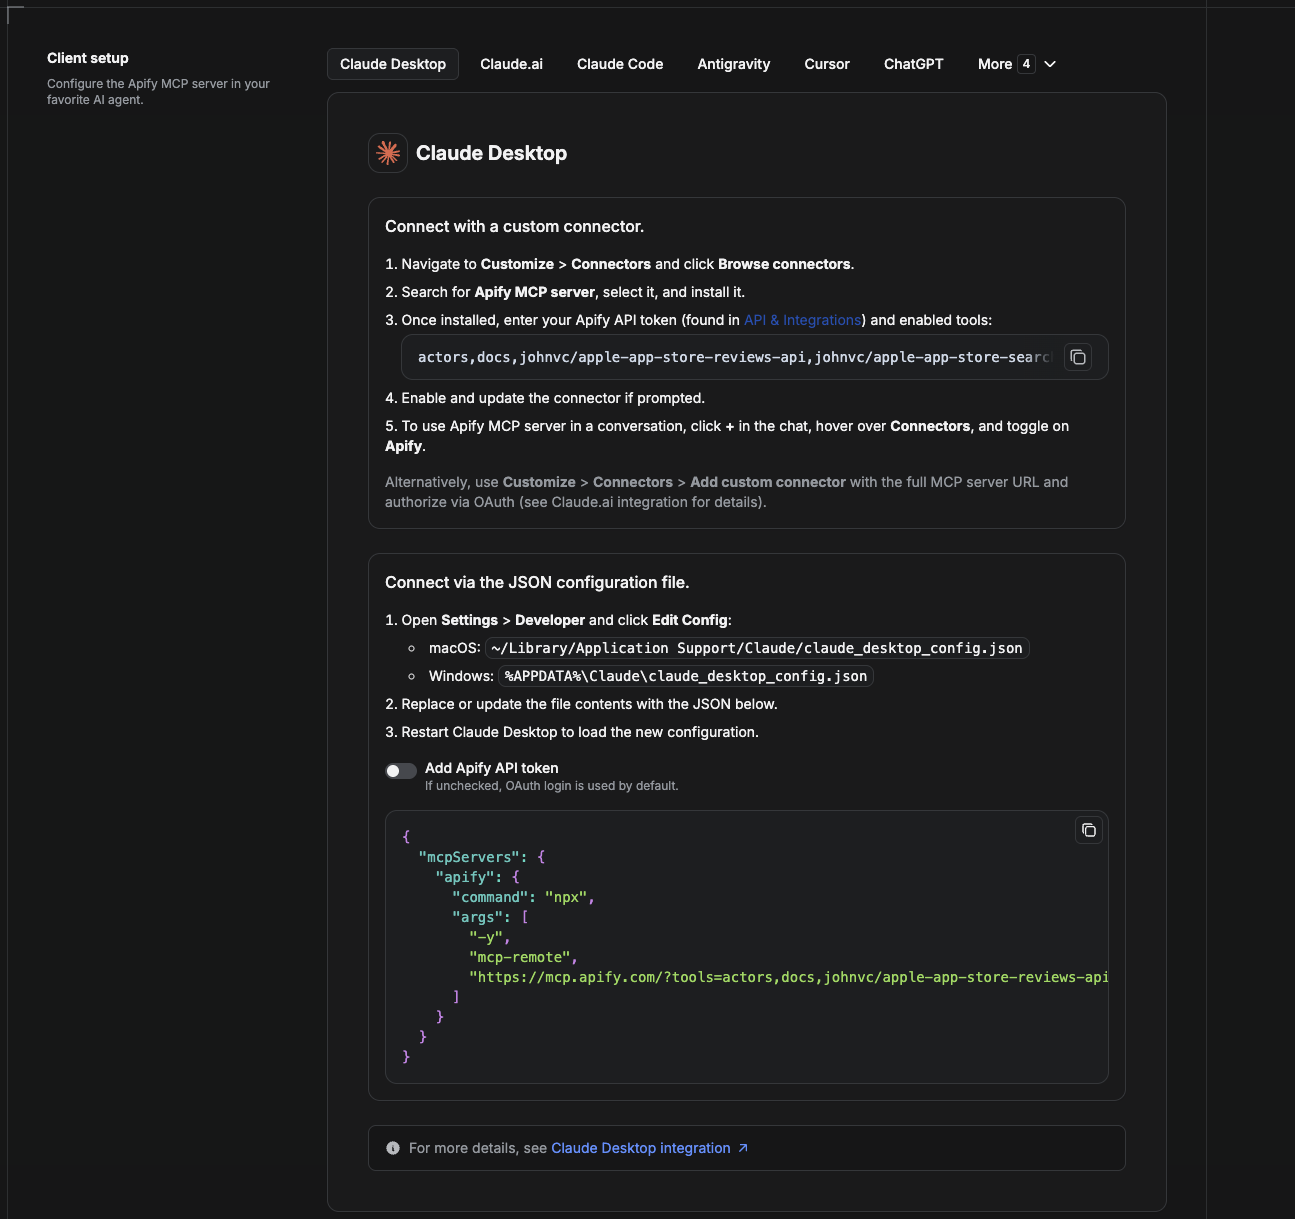
Cowork is the desktop app's automation mode. To give it the Apify Store API as a tool, add the Apify MCP server as a connector.
- Open the Claude desktop app and go to Settings → Connectors (or Settings → Developer → Edit Config to edit
claude_desktop_config.jsondirectly).- macOS:
~/Library/Application Support/Claude/claude_desktop_config.json - Windows:
%APPDATA%\Claude\claude_desktop_config.json
- macOS:
- Add the Apify MCP server, preloaded with only this Actor:
{
  "mcpServers": {
    "apify": {
      "command": "npx",
      "args": [
        "-y",
        "mcp-remote",
        "https://mcp.apify.com/?tools=actors,docs,johnvc/store-actor-intelligence-api"
      ]
    }
  }
}
- Restart the app. When Cowork first calls the tool, complete the OAuth prompt in your browser, or add your Apify API token in the connector settings to skip OAuth.
- In a Cowork chat, confirm the tool is available and ask it to run the Apify Store API.
Download the desktop app and start a free trial: https://claude.ai/referral/uIlpa7nPLg More help: https://docs.apify.com/platform/integrations/claude-desktop
Install in Claude Code
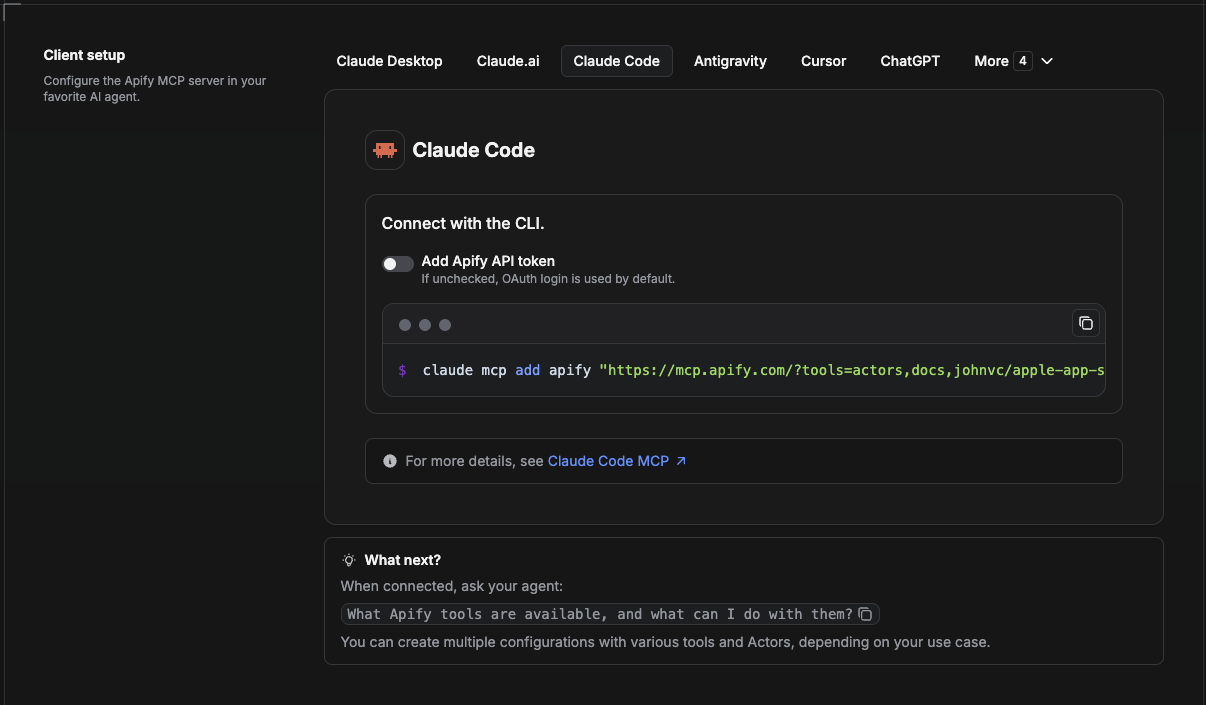
Claude Code is the command-line tool. Add the Actor's MCP server with one command:
claude mcp add --transport http apify \
  "https://mcp.apify.com/?tools=actors,docs,johnvc/store-actor-intelligence-api"
To use a token instead of browser OAuth:
claude mcp add --transport http apify \
  "https://mcp.apify.com/?tools=actors,docs,johnvc/store-actor-intelligence-api" \
  --header "Authorization: Bearer YOUR_APIFY_TOKEN"
Then verify with claude mcp list, or run /mcp inside a session. Ask Claude Code to call the Apify Store API.
Try Claude Code free: https://claude.ai/referral/uIlpa7nPLg Claude Code MCP docs: https://code.claude.com/docs/en/mcp
Install in Claude (website)
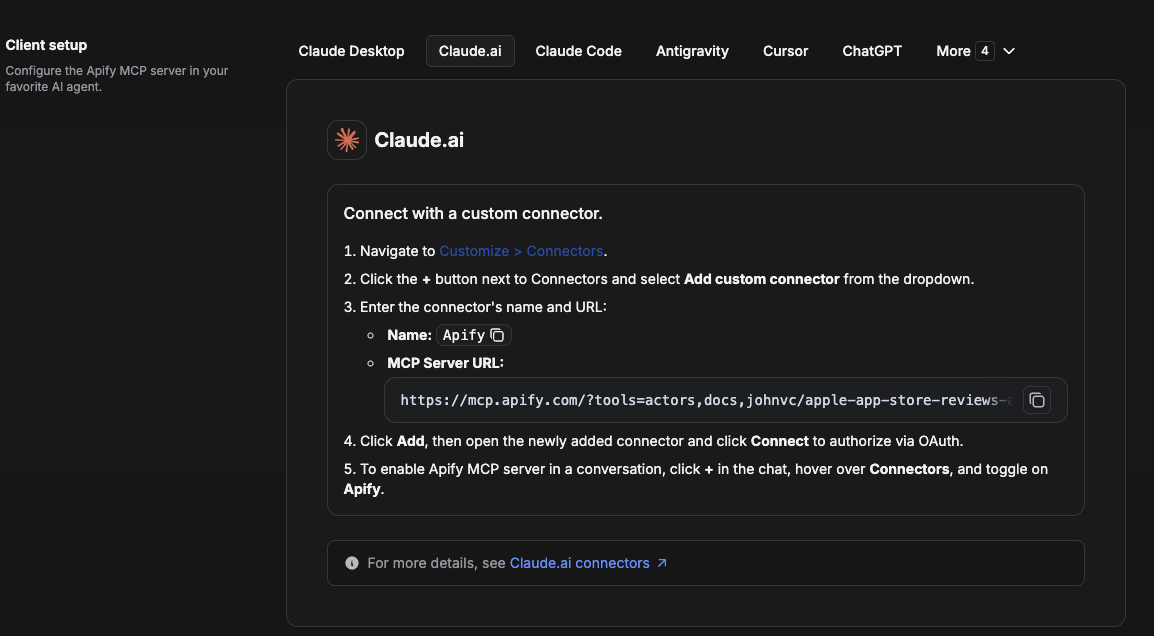
On claude.ai you add Apify as a connector, then enable just this Actor's tool.
- Go to Settings → Connectors → Browse connectors and search for Apify MCP server. Install it (enable or update if prompted).
- When connecting, authenticate with your Apify API token, and enable the tool
johnvc/store-actor-intelligence-api. - In any chat, open + → Connectors and turn on Apify.
- Alternatively, choose Add custom connector and paste the full MCP URL
https://mcp.apify.com/?tools=actors,docs,johnvc/store-actor-intelligence-api, using OAuth when prompted. - Ask Claude to run the Apify Store API.
Open Claude on the web: https://claude.ai
Install in Cursor
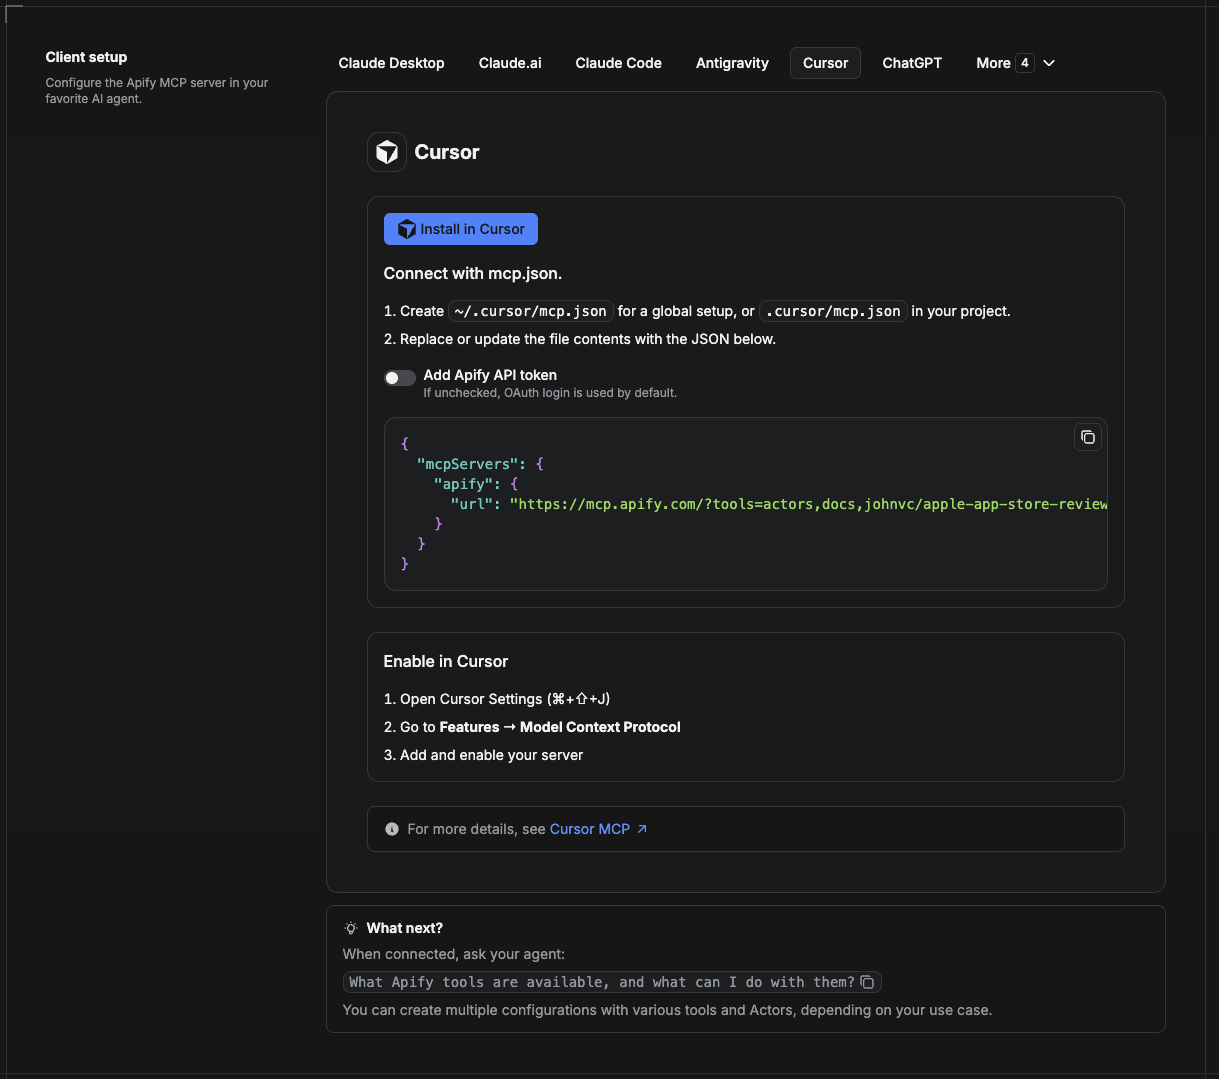
Cursor reads MCP servers from a project file at .cursor/mcp.json.
- In your project, create
.cursor/mcp.json:
{
  "mcpServers": {
    "apify": {
      "url": "https://mcp.apify.com/?tools=actors,docs,johnvc/store-actor-intelligence-api"
    }
  }
}
- If you prefer token auth over browser OAuth, add a header:
{
  "mcpServers": {
    "apify": {
      "url": "https://mcp.apify.com/?tools=actors,docs,johnvc/store-actor-intelligence-api",
      "headers": { "Authorization": "Bearer YOUR_APIFY_TOKEN" }
    }
  }
}
- Open Cursor → Settings → MCP and confirm the apify server is connected (green dot).
- In Composer or Chat, ask Cursor to call the Apify Store API.
New to Cursor? Get it here: https://cursor.com/referral?code=XQP4VBLI3NNX
Install in ChatGPT
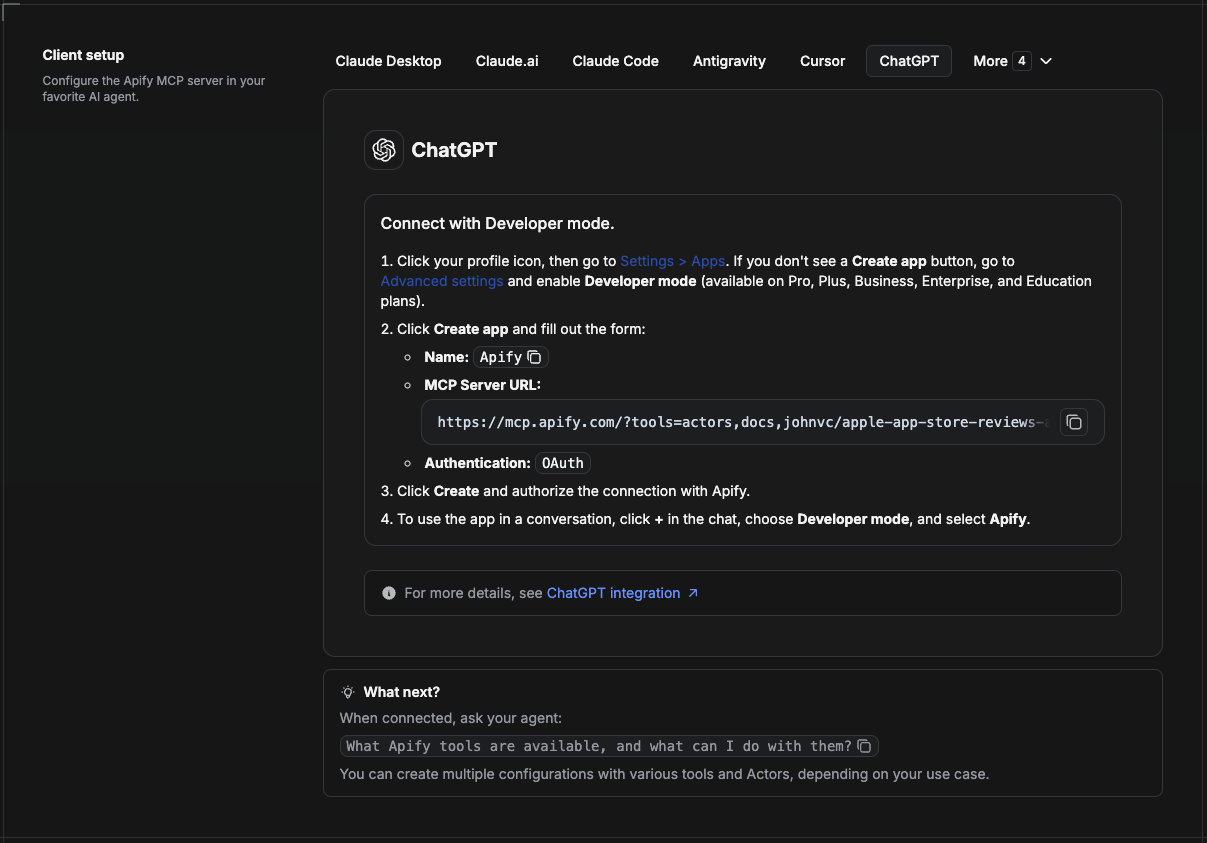
ChatGPT connects to the Apify MCP server through Developer mode (available on ChatGPT Pro, Plus, Business, Enterprise, and Education plans).
- Click your profile icon, then go to Settings > Apps. If you do not see a Create app button, open Advanced settings and enable Developer mode.
- Click Create app and fill out the form:
- Name: Apify
- MCP Server URL:
https://mcp.apify.com/?tools=actors,docs,johnvc/store-actor-intelligence-api - Authentication: OAuth
- Click Create and authorize the connection with Apify.
- To use the app in a conversation, click + in the chat, choose Developer mode, and select Apify.
More help: https://docs.apify.com/platform/integrations/mcp
Made with care by johnvc on Apify.
Last Updated: 2026.06.29
推荐服务器

Baidu Map
百度地图核心API现已全面兼容MCP协议,是国内首家兼容MCP协议的地图服务商。

Playwright MCP Server
一个模型上下文协议服务器,它使大型语言模型能够通过结构化的可访问性快照与网页进行交互,而无需视觉模型或屏幕截图。

Magic Component Platform (MCP)
一个由人工智能驱动的工具,可以从自然语言描述生成现代化的用户界面组件,并与流行的集成开发环境(IDE)集成,从而简化用户界面开发流程。

Audiense Insights MCP Server
通过模型上下文协议启用与 Audiense Insights 账户的交互,从而促进营销洞察和受众数据的提取和分析,包括人口统计信息、行为和影响者互动。

VeyraX
一个单一的 MCP 工具,连接你所有喜爱的工具:Gmail、日历以及其他 40 多个工具。

graphlit-mcp-server
模型上下文协议 (MCP) 服务器实现了 MCP 客户端与 Graphlit 服务之间的集成。 除了网络爬取之外,还可以将任何内容(从 Slack 到 Gmail 再到播客订阅源)导入到 Graphlit 项目中,然后从 MCP 客户端检索相关内容。

Kagi MCP Server
一个 MCP 服务器,集成了 Kagi 搜索功能和 Claude AI,使 Claude 能够在回答需要最新信息的问题时执行实时网络搜索。

e2b-mcp-server
使用 MCP 通过 e2b 运行代码。

Neon MCP Server
用于与 Neon 管理 API 和数据库交互的 MCP 服务器

Exa MCP Server
模型上下文协议(MCP)服务器允许像 Claude 这样的 AI 助手使用 Exa AI 搜索 API 进行网络搜索。这种设置允许 AI 模型以安全和受控的方式获取实时的网络信息。